Build your first Grit app: a full-stack store
In one sitting: scaffold a Category → Product store, handle image uploads, model a one-to-many relationship, and manage all of it from a generated admin panel.
Yesterday I told you why I built Grit. Today we build something real with it — a small store — and you'll see the whole point in action: describe your data, and Grit writes the backend, the frontend hooks, and an admin panel to manage it.
We'll create two models, Category and Product, with a one-to-many relationship (a category has many products). Along the way you'll learn how to scaffold resources, handle file uploads, and model relationships.
Let's build.
1. Install Grit
# macOS / Linuxcurl -fsSL https://gritframework.dev/install.sh | sh# Windows (PowerShell)iwr -useb https://gritframework.dev/install.ps1 | iex
Prefer Go? go install github.com/MUKE-coder/grit/v3/cmd/grit@latest. Check it:
grit version
2. Create the app
grit new my-store --triplecd my-store
--triple scaffolds the full monorepo: a Go API, a customer-facing web app,
and an admin panel — all sharing one types package.
3. Start the infrastructure
Make sure Docker Desktop is running, then from the project root:
docker compose up -d --wait # Postgres, Redis, MinIO, Mailhog — waits until healthypnpm i # install dependencies
Tip: the
--waitflag blocks until Postgres passes its healthcheck, so the migration in step 5 never runs before the database is ready.
4. Scaffold the resources
Because a product belongs to a category, we create the parent (Category) first so the relationship has something to point at.
Category:
grit generate resource Category --fields "name:string,slug:slug,image:file:image"
Product — linked to Category:
grit generate resource Product --fields "name:string,slug:slug,price:int,description:text,thumbnail:file:image,images:files:image,category:belongs_to:Category"
What those field types mean
Each field:type tells Grit how to build the column, the validation, and the admin
input — front to back.
| Field | Type | What it does |
|---|---|---|
name:string | short text | A VARCHAR column + a text input in the admin. |
slug:slug | URL-safe id | Auto-derives a clean, unique slug from the name ("Summer Sale" → summer-sale). Perfect for pretty URLs later. |
price:int | whole number | An integer column. Tip: store money in the smallest unit (cents) to dodge float rounding. |
description:text | long text | A TEXT column + a textarea in the admin. |
thumbnail:file:image | one image | A single image upload. The file goes to object storage (MinIO in dev, S3/R2 in prod) and the record keeps its URL. The admin shows an image picker restricted to images. |
images:files:image | many images | A gallery — multiple image uploads stored as a list of URLs, with a multi-image uploader in the admin. |
category:belongs_to:Category | relationship | The one-to-many link. Adds a CategoryID foreign key on Product + a Category relation, renders a Category dropdown in the admin, and lets the API preload the category with each product. |
What each command generated
One command, the whole vertical slice — for both models:
✓ apps/api/internal/models/<name>.go # GORM model✓ apps/api/internal/services/<name>.go # business logic✓ apps/api/internal/handlers/<name>.go # HTTP handlers + routes✓ packages/shared/schemas/<name>.ts # Zod schema✓ packages/shared/types/<name>.ts # TypeScript types✓ apps/web/hooks/use-<names>.ts # React Query hooks✓ apps/admin/resources/<names>.ts # admin resource + page
No glue code. The two sides of the stack are generated together and stay in sync.
5. Migrate the database
grit migrate
What migrations do: Grit reads your Go models and runs GORM's AutoMigrate to
create or update the matching tables — here, categories and products, including
the category_id foreign key that wires the relationship. It's idempotent, so
re-run it any time you add a field. (grit migrate --fresh drops everything and
starts clean.)
6. Seed initial data
grit seed
What seeding does: it populates the database with starter data — most importantly an admin user you can log in with. Seeders live in your project, so you can add your own demo categories/products later.
7. Run everything
grit start
What grit start does: it boots the Go API + web app + admin panel together,
in parallel, with hot reload — colour-prefixed logs so you can tell who said what.
Ctrl+C stops them all.
8. Open it in the browser
-
Go to http://localhost:3000 — your brand-new Grit web app.
-
Click Admin in the navbar → the admin panel opens at http://localhost:3001.
-
Log in with the seeded admin:
email: admin@example.compassword: admin123
9. Add a few categories
Open Categories → New and add at least three — for example Apparel, Footwear, Accessories. Type a name (the slug fills itself in), upload an image, save. You just used file storage without configuring a thing.
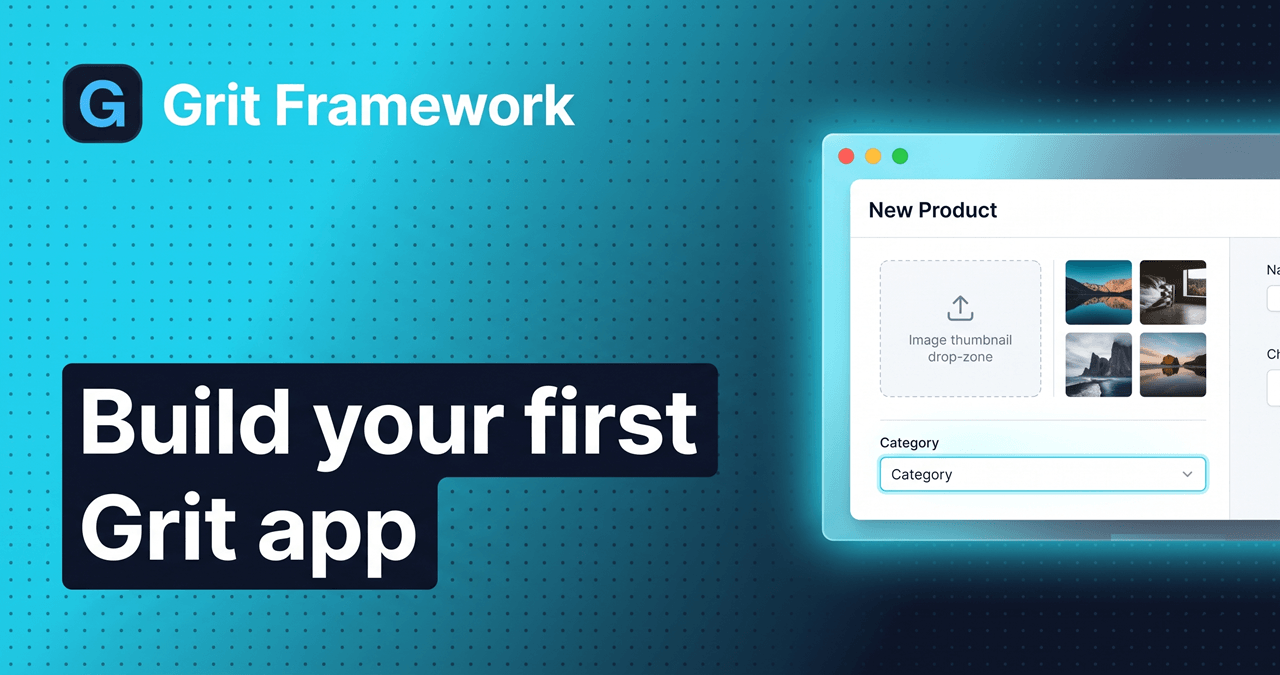
10. Add products — watch the magic
Open Products → New. Notice two things Grit set up for you:
- A thumbnail image picker and a multi-image gallery uploader — file handling, done.
- A Category dropdown that's already populated with the categories you just created. The relationship is wired end to end — no join tables to hand-write, no foreign keys to remember.
Add a few products, each linked to a category. That "wait, it just works" feeling? That's the whole reason Grit exists.
11. Keep exploring
The generated admin ships more than tables and forms. Poke around the Audit trail (who changed what, tamper-evident), the system pages, and the dashboard — all there, all working.
Next up
You now have a real store with real data, managed from a real admin panel — and you wrote zero backend or frontend plumbing to get it. In the next edition of The Daily Grit, we'll take these products and render them on the customer-facing web app, using the generated, type-safe React Query hooks so the frontend and backend never drift.
Go + React. Built with Grit.
Founder of Grit and author of The Daily Grit — a 5-minute morning read on building full-stack apps with Go + React.
Build it with Grit
Go + React, batteries included. Scaffold a production-ready app in one command.
Get started